ATmega328P Microcontroller - The Complete Guide to the 8-bit AVR RISC-based MCU
At the heart of the popular Arduino Uno board lies a powerful yet humble component - the ATmega328P microcontroller. This 8-bit AVR RISC-based microcontroller has become the workhorse of countless electronics projects, from simple blinking LED circuits to complex robotics systems.
In this comprehensive guide, we'll explore the architecture, features, programming methods, and practical applications of this versatile microcontroller that has empowered a generation of makers and engineers.
What is the ATmega328P Microcontroller?
The ATmega328P is a low-power, 8-bit microcontroller based on the AVR enhanced RISC architecture. Developed by Atmel (now Microchip Technology), it executes powerful instructions in a single clock cycle, achieving throughputs approaching 1 MIPS per MHz.
This balance of performance and power consumption makes the ATmega328P ideal for battery-powered applications and embedded systems where efficiency is crucial.
Did You Know?
The "P" in ATmega328P stands for "picoPower," indicating the microcontroller's ultra-low power consumption features that make it suitable for battery-operated applications.
Key Features and Specifications
| Parameter | Specification |
|---|---|
| Architecture | 8-bit AVR RISC |
| Operating Voltage | 1.8V - 5.5V |
| Clock Speed | Up to 20 MHz |
| Flash Memory | 32 KB (0.5 KB used by bootloader) |
| SRAM | 2 KB |
| EEPROM | 1 KB |
| Digital I/O Pins | 23 (6 provide PWM output) |
| Analog Input Pins | 6 (10-bit ADC) |
| Communication Interfaces | UART, SPI, I²C |
| Packages | PDIP-28, TQFP-32, QFN/MLF-32 |
Internal Architecture
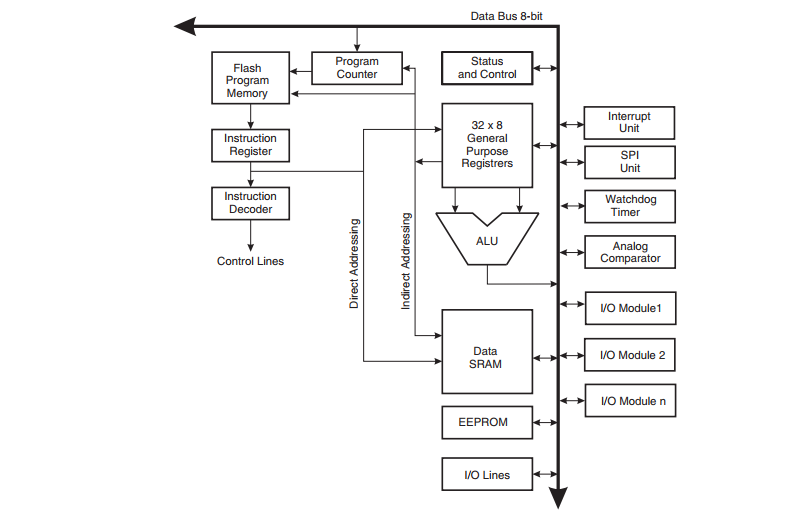
The ATmega328P features a Harvard architecture with separate memories and buses for program and data. Key components include:
- AVR CPU Core: 8-bit RISC processor with 32×8 general purpose registers
- Memory: 32KB flash, 2KB SRAM, and 1KB EEPROM
- Peripherals: Two 8-bit timers, one 16-bit timer, 6-channel 10-bit ADC
- Communication: USART, SPI, and I²C (TWI) interfaces
- Special Features: Watchdog timer, brown-out detector, internal oscillators
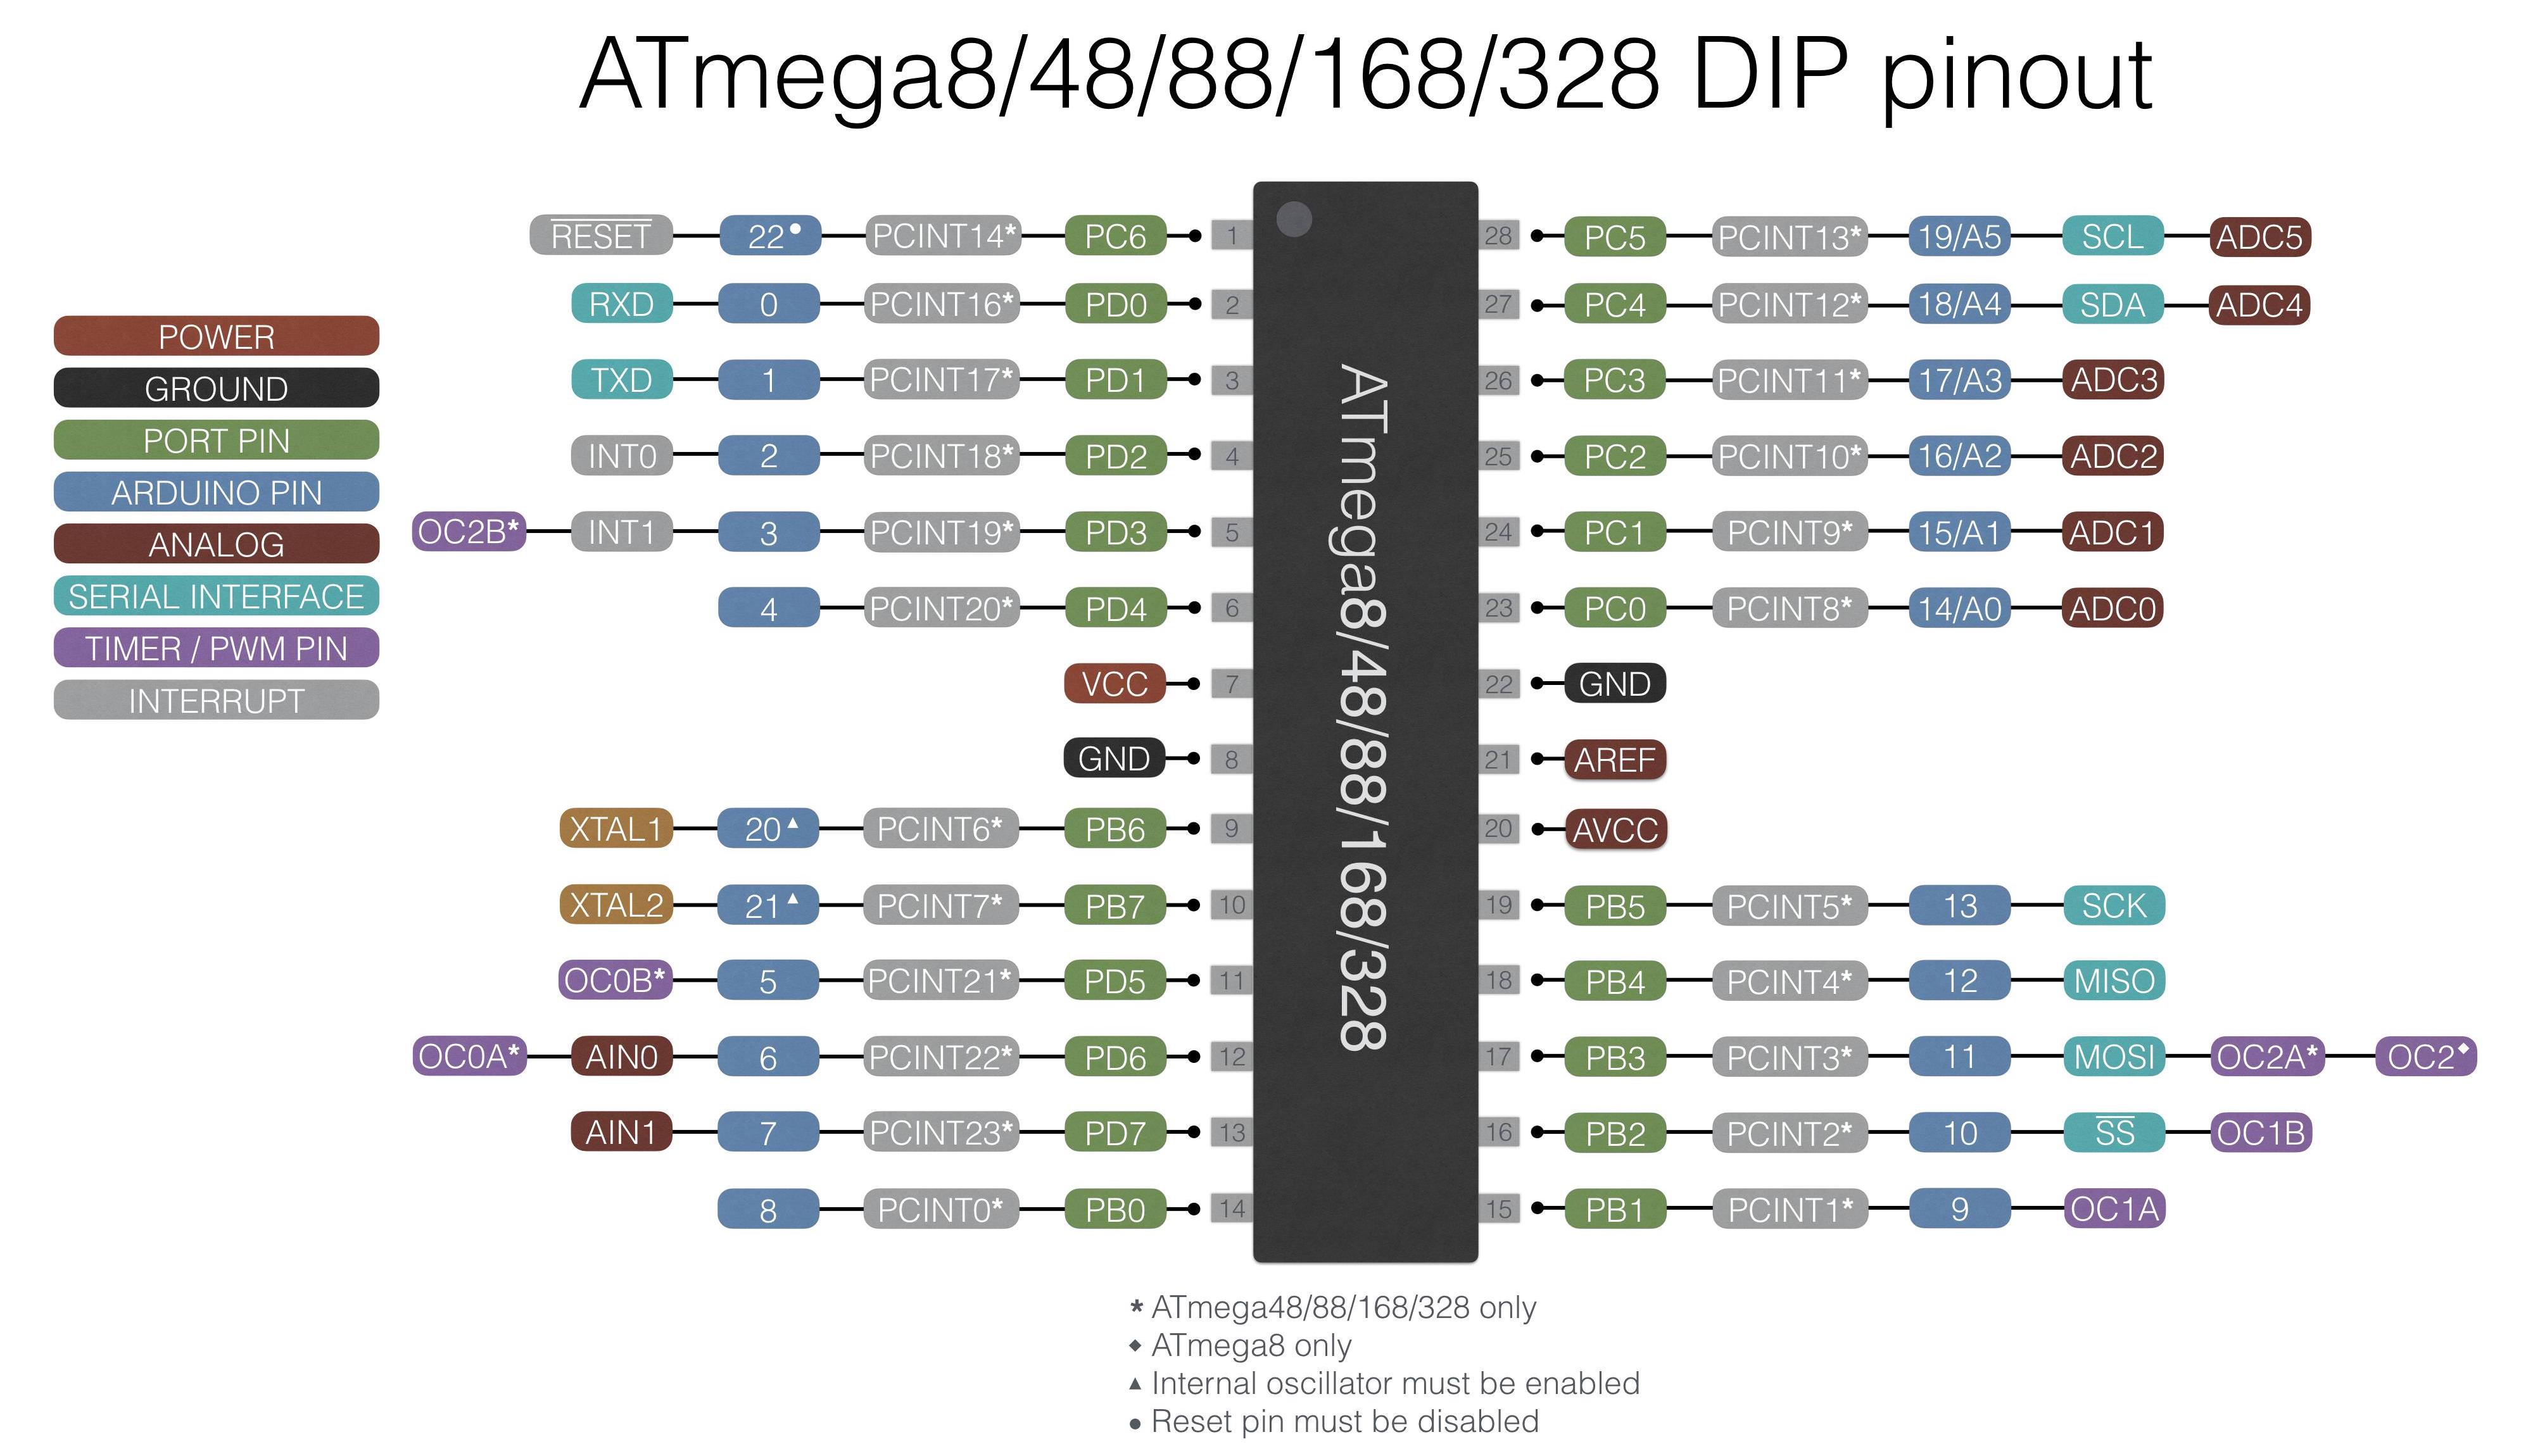
Pin Configuration and Functions
The ATmega328P in its common 28-pin PDIP package offers:
- Port B (PB0-PB5): 6 digital I/O pins with SPI and analog comparator functions
- Port C (PC0-PC5): 6 analog input pins (ADC channels) and reset functionality
- Port D (PD0-PD7): 8 digital I/O pins with UART, external interrupts, and PWM
- Power Pins: VCC, GND, AVCC (ADC power), and AREF (ADC reference)
- Other Pins: RESET, XTAL1/XTAL2 for crystal oscillator
Programming the ATmega328P
There are several methods to program the ATmega328P microcontroller:
- Using Arduino IDE: The simplest method for beginners using Arduino bootloader
- ISP Programming: Using an In-System Programmer like USBasp or Arduino as ISP
- Using PlatformIO: Professional development environment with advanced features
- Atmel Studio: Official IDE from Microchip for bare-metal programming
Programming via Arduino IDE
For quick prototyping with the Arduino ecosystem:
- Install Arduino IDE and select Arduino Uno board
- Connect your programmer or use a pre-loaded bootloader
- Write your code and upload via USB connection
Bare-Metal Programming Example
Memory Organization
The ATmega328P has three main memory sections:
- Flash Memory (32KB): Stores the program code. Organized as 16K × 16
- SRAM (2KB): Volatile memory for data storage during program execution
- EEPROM (1KB): Non-volatile memory for storing data that must persist after power loss
The memory is organized in a Harvard architecture with separate address spaces for program and data memories.
Peripherals and Interfaces
The ATmega328P is packed with powerful peripherals:
Timers/Counters
- Timer/Counter0: 8-bit timer with PWM
- Timer/Counter1: 16-bit timer with PWM
- Timer/Counter2: 8-bit timer with PWM and asynchronous operation
Analog-to-Digital Converter (ADC)
- 10-bit resolution
- 6 channels (8 channels in TQFP and QFN/MLF packages)
- Conversion time of 65-260µs
Communication Interfaces
- USART: Universal Synchronous/Asynchronous Receiver/Transmitter
- SPI: Serial Peripheral Interface for high-speed communication
- TWI: Two-Wire Interface (I²C compatible)
Power Management and Sleep Modes
The ATmega328P features advanced power saving capabilities:
- Idle Mode: CPU stops while peripherals continue operation
- ADC Noise Reduction Mode: CPU and all I/O modules except ADC are stopped
- Power-down Mode: Only external interrupts and watchdog continue operation
- Power-save Mode: Similar to Power-down but with Timer/Counter2 asynchronous operation
- Standby Mode: Crystal oscillator running while rest of device is sleeping
- Extended Standby Mode: Both main oscillator and Timer/Counter2 asynchronous operation
Applications of ATmega328P
The versatility of ATmega328P makes it suitable for numerous applications:
- DIY Electronics: Arduino-based projects, home automation
- Industrial Control: Sensor interfacing, data acquisition systems
- Consumer Electronics: Remote controls, smart devices
- Robotics: Motor control, sensor processing
- Education: Learning embedded systems and microcontroller programming
- IoT Devices: Low-power connected devices with appropriate shields
Comparison with Other Microcontrollers
| Microcontroller | Architecture | Flash Memory | SRAM | Key Advantages |
|---|---|---|---|---|
| ATmega328P | 8-bit AVR | 32KB | 2KB | Low power, extensive community support |
| ESP8266 | 32-bit Tensilica | varies | varies | Built-in Wi-Fi, more processing power |
| STM32F103 | 32-bit ARM Cortex-M3 | 64-256KB | 20-48KB | Higher performance, more peripherals |
| PIC16F877A | 8-bit PIC | 14KB | 368B | Low cost, simple architecture |
Tips for Working with ATmega328P
- Always use decoupling capacitors (100nF) near power pins
- Implement proper reset circuitry with a pull-up resistor
- Use the watchdog timer for critical applications to recover from hangs
- Optimize power consumption by disabling unused peripherals
- Consider using sleep modes in battery-operated applications
- Protect I/O pins with series resistors when connecting to external devices
Where to Buy ATmega328P Microcontrollers
Ready to work with this versatile microcontroller? You can get genuine ATmega328P chips and development boards here:
Buy ATmega328P from RobuKitsWe also offer pre-loaded bootloader versions for easy Arduino compatibility!